Expense Entry
Prerequisites
Before creating and working with the Employee Entry, ensure that the Item and the Employee have already created.
Overview
The Expense Entry document is used to record and manage expenses related to vehicle operations or office activities. It supports both cash and bill expenditures, tracks taxes, discounts, and generates linked Expense Claims or Purchase Invoices as needed.
Accessing Expense Entry
Users with appropriate roles like System Manager, Fleet Manager, or Fleet Master Manager can create, submit, and approve Expense Entries.
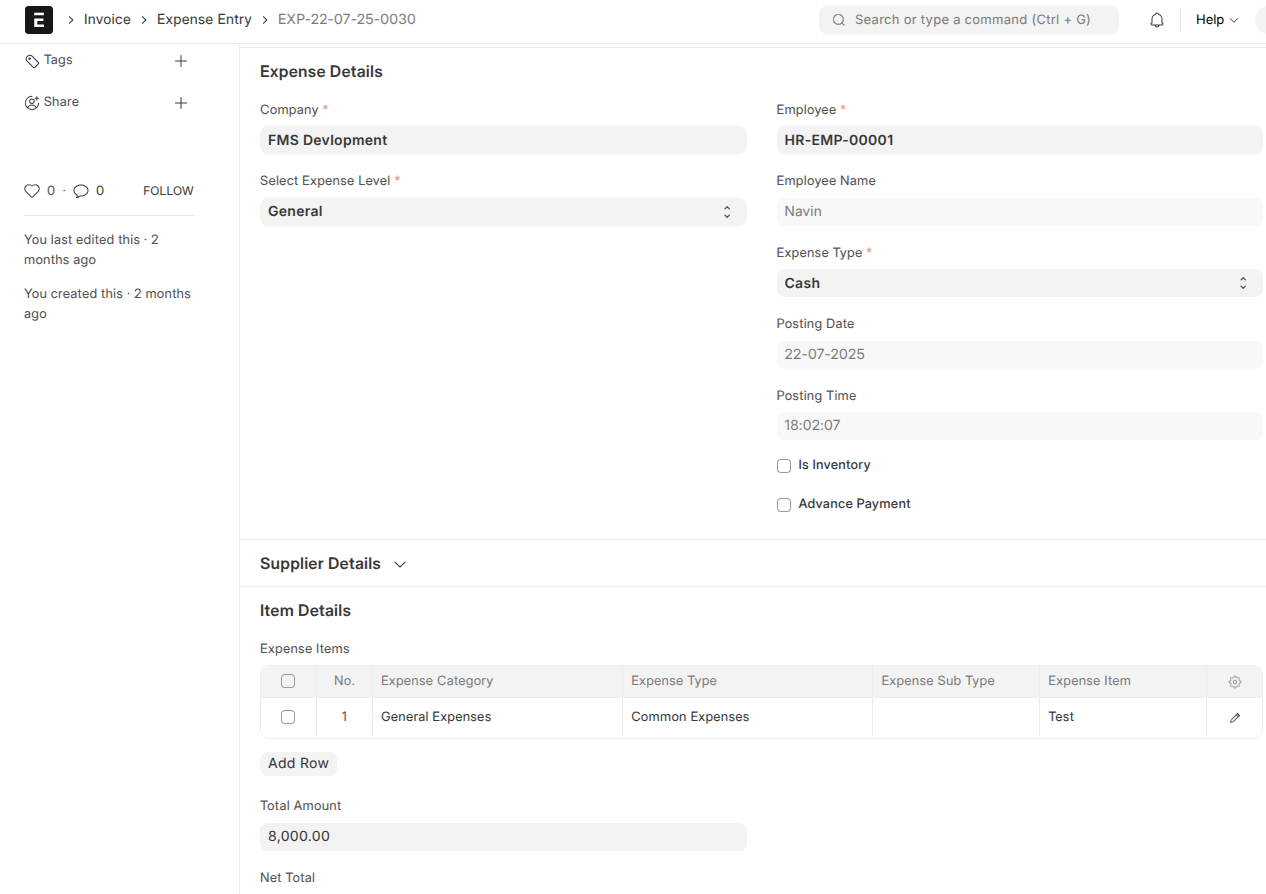
How to Create an Expense Entry
-
Start a New Expense Entry
Navigate to Expense Entry and select New.
-
Fill in General Details
- Company: Your company.
- Select Expense Level: Choose between Vehicle, Office, or General to specify which unit the expense belongs to.
- Supplier: Required if expense type is "Bill".
- Employee: Required if expense type is "Cash".
- Expense Type: Select "Cash" or "Bill".
- Posting Date & Time: Auto-filled but editable.
-
Add Expense Items
Enter details in the Expense Items table:
- Expense Category, Type, Sub Type, and Item: Select using filtered dropdowns based on your selections.
- Quantity and Rate: Enter quantity and rate. Amount is auto-calculated.
-
Review Taxes and Charges
Tax entries appear in the Taxes table. The system calculates tax totals automatically.
-
Apply Discounts (Optional)
Apply additional discount either on Grand Total or Net Total by specifying percentage or amount.
-
Attach Supporting Documents
Upload bill images if selecting Bill type (mandatory).
-
Enter Addresses and Contacts
Select billing and supplier addresses, and contacts are fetched accordingly.
Creating Linked Documents
Once an Expense Entry is submitted:
- If expense type is "Cash" and advance payment is checked, an Employee Advance is created automatically.
- If expense type is "Cash" and no advance payment, an Expense Claim is created.
- If expense type is "Bill" and no advance payment, a Purchase Invoice is created and linked.
Custom Buttons & Actions
After submission, the form displays buttons to create linked Expense Claim or Purchase Invoice based on the expense type.
Validations & Workflow
- Duplicate bills are checked and blocked.
- Row validations ensure quantities and rates are positive for inventory items.
- Expense items are validated against allowed item groups.
- Workflow buttons like Cancel Expense Entry appear based on workflow state.
Status & Totals Calculation
- Totals and taxes are auto-calculated and updated live as the form is edited.
- Outstanding Amount and Rounded Total are computed for accurate payment tracking.
- Status updates automatically as expense claims or purchase invoices are paid or partially paid.
Canceling Expense Entry
Users with proper authority can cancel Expense Entry records in Approved or Unpaid states using the Cancel Expense Entry button. This also cancels or deletes linked purchase invoices accordingly.
Tips and Best Practices
- Maintain accurate expense category and item selections for valid accounting.
- Attach clear, legible bills to avoid rejection.
- Use advance payment flag judiciously to create employee advances only when necessary.
- Carefully select the expense level to ensure expenses are attributed correctly.
- Regularly monitor outstanding amounts for timely reimbursements.